Showing posts with label handmade cards. Show all posts

Monday, July 12, 2010

Wedding Day card!

My Mom asked me to make a card for her - she's attending a wedding this weekend. I think it's fun to get asked to make cards for people I don't even know!!! I made sure I put my blog address on the back so this sweet bride can check out her card - someday!

I really like the way this one turned out! I used my PC Embossing Folder, and stamps were from The Angel Company! The Martha Stewart lace border punch makes the card just perfect for that "lacey" look! Spica Markers twinkle with elegance and a sweet bow for a vertical element on this card!!!


Thursday, July 8, 2010

Peace Frog Birthday Cards

Friends of mine celebrated birthdays this July and inspired by their Peace Frog obsession, I created these cards for them! Hope you like them!

Why is blogger underlining all my writing today? I have no idea!!! Sorry.....


Tuesday, June 29, 2010

Mr. Fix-It Father's Day Cards!

I am blessed with a Dad who's a Mr. Fix-It! Growing up in a Mechanics home was sometimes smelly (carburetors being cleaned on the kitchen table) , sometimes greasy (GOOP and grease stains in the bathroom sink) as well as seeing my dear old Dad's butt and elbows sticking out from under the hood of a car to be fixed! Seems like that's a whole lifetime ago.

Anyway, I love this set of tools from Darcie Heater's stamp set! This was such a fun card to make!

The inside sentiment says: "To my favorite Mr. Fix-It"


Colored with Copic and Spica markers made a huge difference in that "sparkle" that metal tools have!


Thanks for stopping by!

He didn't tell me how to live; he lived, and let me watch him do it. ~Clarence Budington Kellar


Michelle

Saturday, January 9, 2010

Babies, babies, everywhere....2 Projects!

Good Morning Everybody - Babies, babies, everywhere....

I have 2 great projects to share with you - and it's all about the BELLY!!! Yup, I am going to be a new Auntie! My sister is pregnant with baby #3 - and her third GIRL!!! Since this baby was a surprise, it was pretty unanimous that we (a few of her relatives + me) throw her a baby shower!

Project #1
Here is my inspiration for the invite - I am a subscriber to many blogs and this one is just lovely! Click here for Melstampz.blogspot.com - what a great idea but the inspiration was just what I needed for my invites. Of course, I had to tweak my version!

So, here is my version! Do you like it? I hope my sister loves it! They were really fun and easy to make! I must give credit to Templates by Chia - houseofstirfry.com/chia for the FREE template. I did have to play around with getting the cutting just right since I placed the template on the fold of the "shoulders." The tiny heart is a punch I purchased at the dollar bins @ Target. Then, I squeezed a layer of pink Stickles over the heart for a touch of sweet and sparkle!
I have a couple of tips to share: #1 - I went to Walmart and purchased the sew-on snaps for $1.67 - CHEAPPP!!! I did have to play with the bottom of the template to create the snap-flap. But it fit perfectly on a 8.5X11" Solar White white cardstock. I really loved the way it turned out!
Here is a side shot - just so you can see how it opens.

The stitches took some playing with since I did not want to run 30 of these baby onesies through my sewing machine.
Ahhh, Copic markers to the rescue! The E40 Brick White marker worked it's magic and gave me the right amount of shadow and white color for me to make my hand stitches! I really think this gave the onesie it's POP!
Project #2
Since we are on the Baby Theme, funny that a friend of my sister's (same one mentioned above) friend just had a Baby Boy!
For this card I used stamps from The Angel Company (Everyday Events - Elephant & For Baby stamps). The cardstock is Bordering Blue by Stampin' Up, patterned paper from My Mind's Eye, Copic & Spica markers, Crystal Lacquer, light blue organza ribbon from Jo-Ann Stores, a roll of small shipper's twine (source unknown), blue rhinestone sticker from Me & My Big Idea.Here is a close-up of the elephant! I love the way the Crystal Lacquer gives it dimension even when I used foam tape dots for a real 3-D look. If you can see, I used my Burnt Umber ink from Palette Hybrid Ink to edge my papers for a small finishing! You can really see the Silver Spica Marker I used for the "metal" looking wheels!


"A baby is an angel whose wings decrease as his legs increase” ~Author Unknown www.thinkexist.com

Thanks for stopping by...have a great day!

Sunday, December 27, 2009

Puppy Birthday Card

Howdy y'all!

I am posting this card in honor of my 5 year old neice. She is a real hoot! I am telling you the truth, she's the silliest kid I've EVER known! She loves puppies, actually, my sister and I think she may have some canine-like tendancies - somewhat like what Spiderman having spider-like tendancies!!! She plays "dog" and she follows her dog around like she is its sibling!

But what gives me the biggest kick is that she likes to play "hillbilly." I mean no disrespect to anyone out there, but when my sister told me this story over the phone one day, I almost pee'd my pants! Her adorable little 5 year old came downstairs crying because her sister and their other playmates would not play with her. When my sister questioned her about what "hillbilly" was she quite simply said, "you put all the hairclips in your hair and you talk real funny, Mom!" I'd love to know where she picked up that doozy!!!

Here is her birthday card! She oohhed and aaahhhed when she saw the puppies of course! Do you have a funny kid story?


I had to share the following song that just speaks to me and hopefully speaks to you...and the dog lover and God lover in your life!


Click this link in case the video doesn't upload here on my post! I promise you will LOVE this sweet song! Thank you Ms. Wendy Francisco for this sweet song of love!
http://www.youtube.com/watch?v=H17edn_RZoY


Recipe: The Angel Company Stamps/Copic Markers/Palette Hybrid Ink/Bazzill Gingham Ribbon/Provo Craft Embossing Folder/Stampin' Up Cardstock.


"Truly wonderful the mind of a child is." YODA, Star Wars Episode II: Attack of the Clones


Saturday, December 26, 2009

Elzybell's Handmade Gift Certificate

Hi everyone,


Doing some catching up on my postings!


Here is a few gift certificates I made for my sister who is a Nail Tech. One of her customers wanted to give a mani/pedi combo as a gift this Christmas. She called me (she always does) and asks me to make up "something." My sister is going to put the dollar amount on her services, and I get some advertising.... Nice deal, huh? She {{{LOVED}}} them, and I hope her client loved them as well..... I think they turned out pretty cute! What do you think?


Recipe:
Inky Antics & Elzybells/Stampin' UP Markers/Copic & Spica Markers/Stampin' UP cardstock/envelopes misc. source/Palette Hybrid Ink.

"One can get just as much exultation in losing oneself in a little thing as in a big thing. It is nice to think how one can be recklessly lost in a daisy!" Anne Morrow Lindbergh

Friday, November 20, 2009

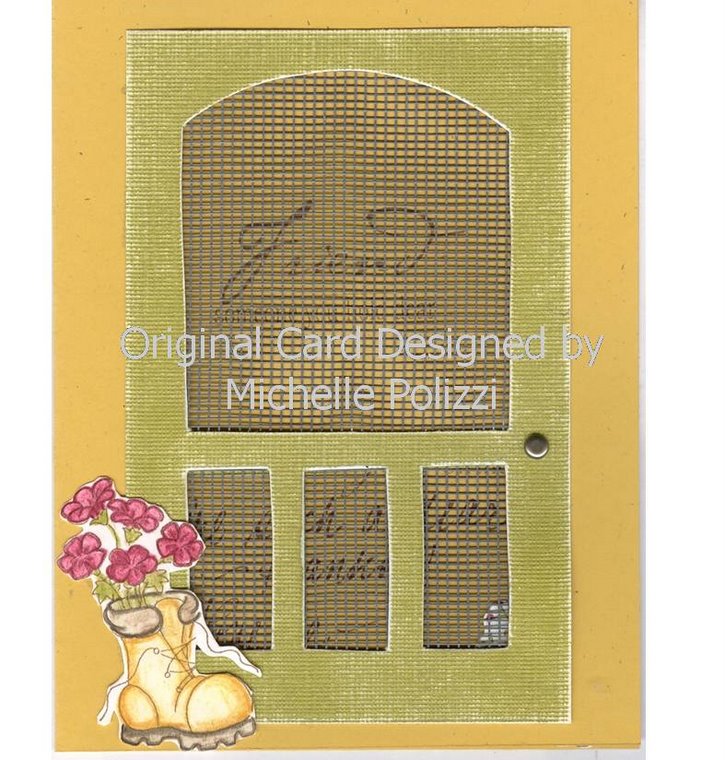
Screen Door Tutorial & Blog Candy in Celebration

I am so excited that I was featured on Die Cuts R Us Blog's "Discovery Zone" Crafter yesterday for my Screen Door Card! So totally cool! Thank you so much Claudia - you totally made my day!!! This papercrafting blogosphere community is so cool! I am honored!

To celebrate this great exposure to my Screen Door design, I am offering BLOG CANDY!
Blog Candy Rules:
Leave me a comment here on this post or on the More Screen Door Samples post for a chance to win one Screen Door Card Kit + the Anya Autumn Screen Door Card that was featured on Die Cuts R Us Blog on Thursday's Discovery Zone. I want to make this fun so: count the number of paper leaves used on the Anya Autumn card, then leave me that number with your comment! BLOG CANDY COMMENTS WILL BE ACCEPTED THRU SUNDAY, NOVEMBER 22 AT MIDNIGHT CST. I will pick a winner on Monday, November 23rd!!! Good luck!


Screen Door Tutorial

I'd like to share with you the Screen Door Kit - what you get and how to use the template. Let's start with first things first. This is what it looks like:
What is a Screen Door Card kit? Well, you will receive a chipboard template to make your very own Screen Door "cut out" for as many applications as you can think of - cards, scrapbook pages, home decor. The only thing I ask you is that you don't use it to enter contests, etc. Please give proper credit if you want to sell it (yup, I'm an Angel with a Policy)!!!
OK, next my kit includes what I like to call enough supplies to make one card. An A2 cardstock card folded for a right to left opening, the inside door template to use trace and cut out using your craft knife for the opening. A brad that coordinates as best as possible! I even include a peice of vinyl screening my husband bought for me at The Home Depot (I think?)! And of course, the instruction sheet - most importantly!!!

The only thing not included is a stamped image that would work perfect for outside the Screen Door. This is where your stamp stash comes in!!! Sometimes I like to imagine what is on my front porch right now...swing, pumpkins, Mums and a bench (and if the kids have been out there, well......)! If you are like me, there are just so many stamps that have not been used in this application - but no worries - they will be used anytime now, I promise! Here is a display I made to feature the Kit at my church craft show!

What is a template only? Well, it's where you would get exactly that just the A2 Screen Door template as well as the Inside Door template - you would supply the cardstock as well as brad & vinyl screening.

Here is what the process looks like when I put one of my cards together - it's not as daunting as I am sounding! Seriously!

Step one: Trace Screen Door template on cardstock - coordinate your door and your card front.Step two: Using craft knife, cut out Screen Door from cardstock.

(Tip: I've never tried the metal/wire version did not want to figure out how to adhere the metal to paper thing!) My favorite is the Terrfically Tacky Tape by Provo Craft - this stuff ROCKS!!!
Step three: I used the Inside Door template to trace the cut out using a craft knife. I usually center as best as possible - but I did measure and my lower right corner of the opening is about 1" from the lower right corner of the card front! Then with a steady hand, cut out.
Step four: Next I trim the vinyl screen peice to fit the Screen Door approximately 1/8" smaller than the door.

Step five: First layer of TTT goes on the back of the Screen Door on the outer edges only! This makes the vinyl adhere quite securely! Believe me, I've tried almost every glue and tape out there and NOTHING else works!Step six: Using another layer of TTT goes on top of the first layer, the only difference is that there is vinyl screening between the layers. Again, stay only on the outer edges ONLY. I know you want to put the Screen Door over that opening - BUT WAIT!!! Using a 1/16" circle punch or a paper peircer, get a hole in the spot where a door knob would go, then secure your brad. It's just a nice touch to hide that brad backing - a clean look!
Step seven: OK, now put that Screen Door over the opening on the card front! Yea!!!!
Here is a look from inside the card - yup, you can see thru it! That is the idea!


Step eight: Now get a sentiment stamp and position it so you can "read" it thru the door - it's what I call the Screen Door card welcome - just like a wreath on your front door @ home! The "home-y" touch we all want!!! Right?

Tada!!! It's finsihed - except for that stamped image you can add anywhere on the card front. My next post I will share some more card samples (see the left sidebar for a few more) you can see for yourself of the card possibilities!!! I have tons of ideas but I am always short on time, and heavy on responsibilities!!! Thanks for looking!!!


Prayer is the key to Heaven, but faith unlocks the door. http://thinkexist.com

Monday, November 16, 2009

Simple Note Cards

Good Monday evening! I've been in my craft room since before dinnertime - I have great kids that made the dinner I pulled out of the freezer tonight so to give me a few hours to make some cards - yup, they are great!!!

I know everyone is in a Thanksgiving or even Christmas cardmaking mood, but I just needed to fill an order for note cards! Let's face it, when we can make money doing what we love - selling cards, etc. - we are going to do it! Even if the order placer was my Mother-in-law (hee hee)! Well, I am in a mood to make some simple note cards anyway - I {{{love}}} this look!

TIP: When making a white background card, use your coordinating ink and "scrub" some color along edges of the paper - almost like giving the inkpad a papercut "feeling." This will give some border to your card and it looks good. I also edged my bee image with my black ink as well. This really helps your card pop just a bit! The idea is to give a hint, but this simplistic look does not need much!

Too bad my picture blurred a bit, and you cannot see the black and grey Spica "glitter" markers I used on my bumblebee...oh well, I am an artist - not a photographer! "And that's all I have to say about that" thank you Forest Gump! Thanks for looking! :)


“Hope is the only bee that makes honey without flowers.” ~ Robert Green Ingersoll quotes http://thinkexist.com

Supplies used: White CS & Golden paper - source unknown/Marvy Uchida Mega Scalloped Circle Punch/Stamps: Elzybells Mini Messages - critters Set/Ink-Momento Tuxedo Black/Markers: Copic & Spica/Ribbon: Offray B&W check.

Saturday, November 14, 2009

OWH Bloghop & Blog Candy!!!

ETA: Blog Candy Contest is now CLOSED, as of Nov. 16 1:30 pm CST. Thanks to all who played along!

My 2 Cards for OWH Bloghop:

Welcome!!! Can you believe 75 stops (as of this post) on the bloghop tour for OWH?!??! How fun is this? November is such a great month for expressing your gratefulness!

I am thankful for the ability to enjoy my {{{free}}} life. Why? Because we have an amazing group of people who give their time and talent and life to ensure we all enjoy our freedom. Who are these people? Our military! Taking time to thank them is not only an honor, but using our talents to thank them is the least we can do for such people who give SO much more!!! So, I took a serious inventory of my stash - and donated over 200 cards to OWH in September - and proud to do so!!! This time my "Any Hero" cards only number 12, but my prayer is that 12 hearts be touched that someone in the U.S. cares and is truly grateful, eh hem, little ol' me!!!
So without further adeu, let's see the "Any Hero" cards - - and scroll down for my daughter's card, too!
Number 1 - (made 8 of these):
Here is what I usually like to write in my "Any Hero" cards - simple and to the point:
Number 2 (made 4 of these): Now my daughter's card. Sarina turns 6 on the 19th and she already has such a giving spirit! I just {{{had}}} to post this card - in her own handwriting!!! Isn't it sweet?
{{{Sources - Stamps: The Angel Company - set: Retired Quilt Flag T540/Cardstock: Stampin' Up/Ink: Momento Tuxedo Black & Palette Burnt Umber/Ribbon & Brad: unknown sources/Coloring: Copic Markers & Spica Markers/Embossing Folder: Stars by ProvoCraft for Cuttlebug}}}
Now for some Blog Candy:

Leave me a comment and one lucky winner will receive my Screen Door Card kit!!! See the left sidebar a picture of my Screend Door card.
With this kit you will be able to make one the A2 size Screen Door card + the chipboard template. The kit contains: instructions, card stock A2 card, a screen door cutout, a piece of vinyl screening, a brad, - and the template that allows you to continue to make these great cards for all of your friends and family for years to come! Good luck! Winner announced Monday, November 16!
Your next stop,
Kelly is so cool; she's a military Wife & Mom of 2 (working outside her home as well as running a Stampin' Up home biz all from Bavaria, Germany! Wow, another hero - if you look around, God has placed them everywhere!!! Enjoy her great cards!!!

Have fun on the bloghop!!!
No One Diets on Thanksgiving. What we're really talking about is a wonderful day set aside on the fourth Thursday of November when no one diets. I mean, why else would they call it Thanksgiving? ~Erma Bombeck source: www.quotes.about.com